Note
By default, you cannot invite external users to collaborate on a Hub. To allow it, you need to turn this restriction off in your Hub settings. See section Co-owner and editor settings on a Hub level in Creating and Deleting a Hub for more information on Hub settings.
Note that external users can only be viewers.
Sharing with groups
Only groups with permissions other than Admins Only show up on the list of groups you can share a Hub with. Make sure you have the necessary permissions to add the group. For details, see Creating and Managing Groups.Sharing using a shared link
You can create a shared link to quickly send it to people from your enterprise and outside of it. Both the internal and external users have to sign in to Box to access the content of a Hub, unless you chose the permission level People with the link.Note
If you access Box Hubs through a shared link and you have an editor access to some files or folders, you can’t edit them from a Hub level. For more information on shared links see Creating Shared Links.
If you access Box Hubs through a shared link and you have an editor access to some files or folders, you can’t edit them from a Hub level. For more information on shared links see Creating Shared Links.
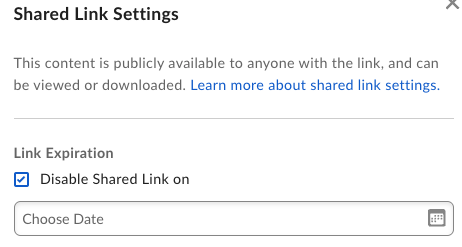
Shared link settings
As a Hub editor, you can configure the shared link options. For more information, see Configuring Individual Shared Link Settings.Note
If you have the Viewer permissions, you can check what settings are in place for a specific shared link to learn what you can do with it.
If you have the Viewer permissions, you can check what settings are in place for a specific shared link to learn what you can do with it.
- Link Expiration - Set an expiration date for your shared link
- Password Protect - Require password
- Non-private custom URL - Publish content broadly with a custom, non-private URL
- Allow Download - Allow users with the shared link to download this item
Note
If there is a Shield policy in place that restricts downloads, the Download button is visible only in Preview.
If there is a Shield policy in place that restricts downloads, the Download button is visible only in Preview.
Setting a shared link expiration date
As a Hub co-owner or editor you can setup an expiration date for a shared link. To do so:- Open the shared link settings.
- Click Disable Shared Link on under Link Expiration.
- Select the expiration date.
- Open the shared link settings.
- Click the Choose Date input field or the calendar icon.
- Choose the new link expiration date and save the settings.
- Open the shared link settings.
- Uncheck the checkbox Disable Shared Link on under Link Expiration.
- Save your changes.
Note
Your enterprise admin can enable link expirations on an enterprise level. When you are a Hub co-owner or editor, you can change the expiration date in the link settings.
Your enterprise admin can enable link expirations on an enterprise level. When you are a Hub co-owner or editor, you can change the expiration date in the link settings.
Removing collaborators
To remove collaborators from a Hub:-
- Click the Share button.
- Click Shared with.
- Click Manage All.
- Choose Remove from the drop-down list.