- Securely request files from people without adding collaborators on a folder
- Gather additional information with metadata attribute fields, which you can set as required/optional
- Enable extra security and email validation with link settings
- Kick off automated workflows using Box Relay
Notes
- You must have a Box Business Plan account or higher to build a File Request form. However, no one needs a Box account to access the finished form and upload content.
- An external collaborator cannot create file request links, even if the collaborator is a co-owner or editor of the content.
Creating your File Request Form
- Select the folder that you want to contain the uploaded files
- In the Sharing pane on the right, under File Request, click Create Link.
- You can also click the ellipsis (…) to display the More Options menu, and then click File Request.
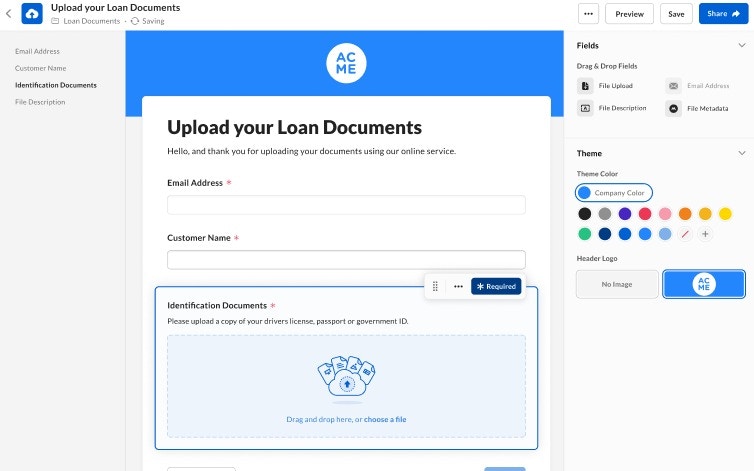
- Click Edit. The Submit Files window opens, displaying a default title and upload files area.
- At the top of the form, enter your title.
- Make the title clear and unique, to help the people submitting content quickly understand what you’re asking them to provide.
- The default title is “Submit Files,” which you can keep if you like
- Optionally, add a sentence or two describing the content you are soliciting, and perhaps any instructions you wish to provide.
Notes
- The size limit on file uploads depends on the limit of your organization’s enterprise tier. Contact your Box Admin to confirm what the maximum size file you can upload.
- Files are uploaded immediately at submission and are authorized by a 24-hour token. If the file does not upload within that period (e.g., due to slow internet or large file size), the token expires and the file will not be uploaded.
- People can upload up to 500 files at a time.
- You can only have one File Request per folder.
- People cannot upload folders via File Request — only files.
- The Toggle Link is Enabled is enabled by default.
Content Fields to add
When creating a file request, you can add fields to the form to request additional information including:- The sender’s email address (if this option is not already enabled by you Admin).
- A description of the file or files being uploaded.
- Additional Simplify and clarify your request by adding one or more file upload.
- Extending the form and enhancing the business value of your request by adding file metadata.
- Edit the file request
- At the bottom of the File Request window or from the right menu, select from the following fields:
- Email address.
- You can only add this field once.
- File Description.
- File Upload.
- File Metadata
- Email address.
- Click Save.
- In the left half of the window, click the template you want. That template’s fields (that is, file attributes) display in the right half of the window.
- Check the attributes you want and click Add Fields.
- By default, all metadata fields are required. To make any field optional:
- Select the field you want.
- Click Required. An asterisk appears next the name of the field.
- (Optional) To add descriptions to your fields:
- Select the field you want
- Click the ellipsis (…)
- Check Add a description
- If you save this form and wish subsequently to add more fields, click the Add a Field > Metadata again to display metadata attributes you initially left off. This enables you, for example, to clearly describe the information you’re requesting, and why you want it. You can also make the description field optional or required.
- By default, all metadata fields are required. To make any field optional:
- At the top right of the screen, click Preview. Box displays a preview of your File Request form in a new tab, just as the form will display to the people using it to send their files.
- If the form looks good, return to the File Request window to copy the link.
- If you wish to make changes, see below.
- Open the File Request form.
- Select a field to move by clicking the vertical icon
 and dragging the field.
 - To add another field:
- Click Add a Field.
- Drag and drop the field from the right panel to the desired location.
- Hover over the horizontal separator and click + to open the options for adding a field.
- To remove a field from the form, click the ellipsis (…) to display the More Options menu, and then click Delete.
- Click the ellipsis (…) to display the More Options menu.
- Select File Request.
- Click Edit and make the desired changes.
- Click Save.
- Toward the top right of the screen click Share. When the File Request window displays, toward the bottom click Settings. The Settings window displays.
- To require managed users to log into Box before submitting files, click the Require uploaders to log in to Box slider to move it to the right.
- If this box is not available, it means your Box Administrator is requiring that all content uploaders log in to their Box accounts before submitting their files. In this case File Request automatically captures and validates the email of the uploader. Box displays their identity when you preview the file in the Box Web app, in the More Details section, under Uploader.
- To set an expiration date for the link to you File Request form, click to move the Set a link expiration date slider to the right, and then set the date you want.
- When you’re done, click Save.
Embedding File Request into an existing Web page
You can embed your File Request form within a larger Web page, rather than creating a new and discrete page. To create an embed widget from your File Request- Navigate to the folder that has the File Request link.
- Click the ellipsis (…) to display the More Options menu.
- Click File Request. The File Request window opens, displaying a link.
- To the right of the link, click the code box (
 ). This copies to your clipboard a snippet of HTML code.
- Navigate to the folder that has the File Request link.
- Click the ellipsis (…) to display the More Options menu,
- Click File Request. The File Request window opens.
- Click Edit. The File Request form displays.
- At the top of the form, click the ellipsis (…).
- From the menu that displays, click Delete.
- You can also disable and then delete the link to your File Request form.
- When you delete a File Request form you cannot recover it. You need to rebuild it again after deleting it.
- Guarantee that uploads came from the right person
- Confirm that the email address entered is correct
- In your BoxFiles window, open the file. Box displays the file in Box Preview.
- In Box Preview’s right sidebar, click the Details icon.
- In the Details panel, Box displays the email address under Uploader.