Account Tab
The Account tab contains the basic account settings for your account.General Options
The General Options section contains settings for basic account operation.| Setting | Description |
|---|---|
| Home Page | Determines the default home page of your Box account, the first page you see when you log in. Select from:
|
| Files and Folders per Page | Determines the number of files and folders displayed on pages other than the Files page. (The Files page provides infinite scroll.) Select from:
Selecting a larger number can make it easier to scroll through files, but can increase download time, depending on the speed of your network. |
| Time Zone | Defines the time zone in which you are located. |
| Language | Defines the language used in your account. for the Box user interface. |
| Display Item Tags | Determines whether you see tags on files and folders. |
Admin Options
Available only for the user who is the administrator for an enterprise, this contains a Business Settings button that take the admin directly to the Account & Billing section of the Admin Console, where you can purchase more seats or upgrade your account.Login and Email Addresses
The Login and Email Addresses section contains your default email address, as well as any additional email addresses you’ve added to your account. In this section, you can update your email address. You can also link multiple email addresses to the same account in Box. Any collaboration invites that go to these secondary email addresses (or Email Aliases) will get funneled into your primary Box account. This also prevents anyone from creating a new Box account using that email address. Other users only see your primary email address and all notifications from Box continue to be sent to your primary address. You can also use the secondary email to log in if the single sign-on feature is configured to look for the secondary email instead of the primary email. To add an email address:- Select one of the following options:
- For paid accounts, click Link Email.
- For free accounts, click Link Personal Email.
- Enter a valid email address.
- Click Save.
- Click Make Primary next to the email address you want as your primary email address.
- Click Remove next to the email address you want to remove.
- In the confirmation dialog box, click Okay.
Authentication
The Authentication section contains your current password, obfuscated for security. If you do not have a password defined, you can create a password. To change your password, see Changing Your Password. If you are unable to log in to change your password, you can reset your password.2-Step Verification
The 2-Step Verification section is where you can enable and configure 2-Factor Authentication (2FA) for your account.Account Details
The Account Details section information about your Box account, including:- Account type - Individual, Business, Enterprise, etc.
- Account ID - The unique identifier for your account
- Storage Used - How much storage you are using currently on Box, in megabytes (MB) and how much storage your account is allocated
- Bandwidth Used - How much bandwidth your account has used
- Max File Size - The largest file you can upload to Box
- Login Address - The direct URL you can use to login to Box
- Admin Contact - If you are in a Business or Enterprise account, the email address of your primary administrator
Sharing Tab
The Sharing tab is where you configure how you share your content and the default settings for sharing.Shared Links
The Shared Links section contains default settings for shared links. These settings will only apply to shared links created on content you own.| Setting | Description |
|---|---|
| Allow Shared Links for | Defines the content type you allow to be shared. Select from:
NoteYou can share only content you own. |
| People who can access shared links | Defines what access options are available for the content types selected above. By default, all options are enabled, meaning that you can choose, per item, what access permission to grant your content. Select from:
If you change this setting from a less restrictive setting to a more restrictive setting and then back again, shared links created before the setting changes retain their type. |
| Default access for new links | Defines the default access level of newly-created shared links. If you have limited the access options in an earlier setting, your options here are limited accordingly.
You can still change the access type when you generate a shared link. |
| Actions link recipients can take | Defines the allowed and default permissions for file, folder, and Box Notes shared links. For files, folders, and Box Notes, you define both the maximum permission allowed and the default permission when users share links, and you select from the following values for each:
For each part of these options:
|
Collaborating on Content
By default, your account is set to automatically accept invitations to collaborate. Uncheck the box under Incoming Invitations if you’d like to have the opportunity to accept or reject collaboration invitations.Uploading Content (Box Accelerator)
Box Accelerator is a global data transfer network that improves the speed of your uploads. If you’re having issues with uploads, try turning this off. If your uploads seem slow, you may have a problem with your network or firewall. See Troubleshooting: Uploads for more information.Notifications Tab
The Notification tab is where you configure what you get notified for and how to get notified.Email Notifications
The Email Notifications section is where you define for which Box events you are notified. Email notifications for Co-owners is controlled by In Items I Own checkboxes. For both folders you own and folders you’ve joined (in which you are a collaborator), you can get notified for:- Downloads
- Uploads
- Comments (the default is selected for folders you own)
- Previews
- Deletes (the default is selected for folders you own)
- Enterprise-wide email notifications: When email notifications are applied in the Admin Console, it will be the default for all newly created end users until the end user adjusts their settings.
- Account-wide email notifications: When email notifications are applied in the Account Settings, it will be the default notification setting for all newly created folders in the account OR for folders that are set to “Use my default notification settings”.
- End users in a Box instance can have different account wide settings by manually adjusting their email notification settings.
- Folder specific level email notifications: When email notifications are applied in the Folder Settings, it will be the default email notifications for all files in the folder and subfolders. Please note that you cannot trigger email notifications to yourself for actions you triggered.
- Different users collaborating in a folder can set their own specific Folder level email notifications (if allowed by the folder owner).
General Emails and Notifications
The General Emails and Notifications section is where you can control the emails you will receive from Box. You can choose to receive the following email:- Login Activity: Get notified when your account is accessed from a new device.
- Shuttle Activity: Get notified about results of Shuttle jobs.
App Notifications
The App Notifications section is where you can enable receiving Box notifications in any third-party apps for which you have enabled integrations and that can receive those notifications.Security Tab
The Security tab is where you get information about your account security.Login Activity
The Login Activity section of your Account Settings is useful for monitoring access to your Box account. You will see a list of all the applications, devices, and locations you’ve used to log in to Box.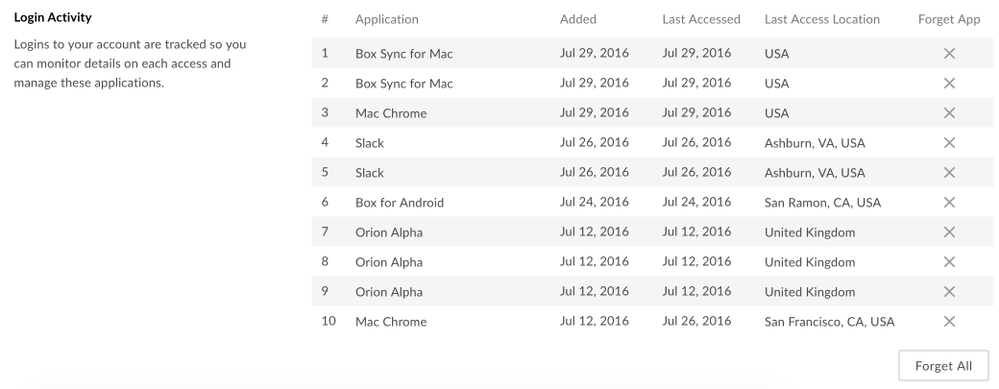
Profile Tab
The profile tab contains information about your profile, including your name, profile picture, and contact information.User Profile
The User Profile section lists the information you enter about your profile. To edit your profile information- Click into one of the text boxes.
- Make any desired changes.
- Click Save Changes.
- Click Change.
- Select the image you would like to use from the file browser
- Click Open.
- Click Remove.